Favorite Spaces: The Porch

Being unemployed* is weird. Days are like three times as long as they are when I’m actually working, and it’s nice to have time to enjoy my house. The weather has been perfect the last two days, so I’ve been enjoyed some time out on my porch.

I thought I’d share some of my favorite things on the porch since its come together so well!

The chair I redid with my mom.

With the series of “Rock Pictures” my sister gave me for my birthday last year (taken every time we go to our family’s house in Lake Tahoe)

The comfy hand-me-down chair that’s great to read in, with my garden stool that I wanted forever.

My cabinet (which was oddly impossible to find), with the cute prints we got from Orange Beautiful and framed.

The totally useless but adorable glass lantern

What’s your favorite place in your house?

*I’m not really-truly unemployed. I’m just not working because it’s summer and I’m a teacher. But it’s still weird.

Paper Stars

Paper stars were one of the first, if not the first, craft project Mary and I ever did together. We originally made a bunch as a birthday present for a friend who was decorating her room with a starry night theme. (Apparently when someone tells me I probably can’t do something, like make 3D stars out of paper, I feel inclined to prove them wrong.) They were a huge hit. Then we made a bunch for our room. Then, when we moved, we hung them from the ceiling of our office.

So when we were trying to think of something good for our blog masthead, paper stars seemed like a logical choice. And now you can learn to make your very own!

Now, making the template takes longer than making any of the stars. And the first one or two might be rough, as you are learning to make even folds and match up edges and get the glue to hold while not flattening the whole thing. But! Once you make the first few, they are actually pretty fast and addictive.

Paper Stars

You’ll need…

  • Stiff paper for template
  • Decorative paper for the stars (we’ve used construction, water color, and scrapbook paper with equal success)
  • Protractor
  • Pencil
  • Glue (fine tip glue for scrapbooks works really well)
  • Scissors

Template

  1. Trace a circle onto the template paper using the inner edge of your compass.
  2. Place the Protractor over the circle, and mark at 90° and the mid-point of the straight edge. Flip the protractor so that you mark it at 90° on the other side—marking a straight line dividing the circle exactly in half. Use the edge of the protractor to trace this entire line, and mark the halfway point so you can see the exact center of the circle. (My protractor has a handy opening for just this purpose.)
  3. Making sure your protractor stays centered, mark a point on the circle 72° from the marked line.

    Draw a line through that point and the center point to the other side of the circle.

    Repeat until you’ve made five lines, and the circle is divided into 10 sections. (Alternatively, you can mark every 36° around the circle and connect the dots to make the 10 sections.)
  4. Start at the top point, skip three lines around the edge, and line up your straight edge between the top point and the fourth point. Draw a line between the points.
  5. Skip the next three lines and use your straight edge to draw a line between the fourth point and where you left off.
  6. Repeat until you have a five-point star.
  7. Move your straight edge about 3 or 4 mm from one of the star’s sides and draw a parallel line, skipping the inside of the star itself.

    Repeat until you’ve created a second set of lines around each point (these lines are used for the flaps).
  8. Use your straight edge to mark a gradual taper at each point between the outside lines and the point.
  9. Cut out your template, following the outside lines and the tapered points.

Cutting and folding stars

  1. Trace the template onto the back of your decorative paper. Repeat to trace a second star.
  2. Cut out both stars.
  3. Fold the star in half from an outer point to the inner point directly across from it. Unfold.
  4. Turn the star, and fold in half at the next point.
  5. Repeat until the star has been folded in half at every point.
  6. Gently fold the star, tucking the inside point down and folding the two “legs” on either side together.
  7. Repeat around, so that every inside point folds in, and every outside point folds out.
  8. Now you’ll need to cut a small notch on every inside point to make the folding flaps. Look at your template to see how large this flap needs to be—it’s the distance from the outside of the template to the inner point on the inside set of lines. Cut the notches on all inside points.
  9. Fold each flap in from the notch to the tip of the outside point.
  10. Repeat with the other star, and figure out which points best match each other when they are help inside-to-inside.
  11. Place glue on the flaps of two adjacent points, and firmly press the two star halves together along the glue line. It doesn’t matter if you flatten the stars at this point.
  12. When the glue is dry, gently pop the stars back into their 3D shape, and add glue along two more edges. Be more gentle as you press these edges together—the more edges that are glued, the more difficult it is to pop the star back into shape.
  13. Glue the final edges together and gently press together–by this time, the shape of the star itself should help hold it together.

As you create more stars, you’ll get better at folding evenly, and you’ll discover your own technique for gluing.

{Mary adds:}

{I made a mobile for a coworker with a new baby using the star template, and it turned out awesome. Non-directions here–at the end.}

Have you ever made something cool just to prove you could?

A Better Bathroom: Let’s Make some Decisions!

I’ve been silent on the bathroom front lately, I know. But I’ve actually been making some progress and (fingers crossed!) will start soon.

Here’s the scoop:

Still out in Colorado (um, almost a month ago), we went shopping. Here’s some of the fun we found:

And this mirror:

Still love the mirror. The vanity is 36 in. wide, and I think staying under 32 in. is going to be best for me. But the rest of the plan has really been coming together.

  • There’s going to be a vanity, and it will measure between 30 – 36 in. wide
  • The medicine cabinet will feature an oval mirror
  • There will be 3 open shelves above the toilet
  • The vanity will be dark with a light top, have an open shelf, and (hopefully!) two drawers and a cabinet
  • The tiles are (mostly) chosen

So. The good stuff?

That’s the layout the contractor drew for me. Everything has to go on that one long wall, so that’s basically all I needed. The vanity and mirror will match my ideas above, and the shelves aren’t there, but we’ve got the rest of it.

I’m not positive I will go with him yet (but I do like him), but I love the To Do list he gave me.

  1. Choose tile (Floor, shower wall, shower floor)
  2. Choose vanity
  3. Buy shower hardware
  4. Buy other hardware (ceiling light with vent fan, vanity light)

I’ve pretty much decided on my tile (it was in the sneak peak that Lesley shared in her post!) and I’ve looked at bunches of vanities (unsuccessfully). I haven’t even thought about lights though.

So here are my big questions that I need to decide before I’m ready to start (in addition to choosing a darn vanity!):

Big Question #1: What to do with the left-most side of the room (right next to where the door opens)?

Minor Question #1: Do I want a ceiling light with a fan (not required, the bathroom has a window)?

Minor Question #2: What goes above the sink? Backsplash? Continue tile?

It also comes down to how much storage I can eke out. My place has only two (?!) real closets, and I would love to put some real storage into the bathroom. But how much does storage balance with other desires?

The rest is mostly aesthetics and minor decisions, so I just need to do some materials choosing and get on with it.

For BQ#1, it’s a space issue. Space is obviously finite and I want to have the biggest shower possible. But biggest measures in two dimensions, and that’s the problem. As in the diagram above, it can go from the door to the edge of the vanity. I made myself a table, but I’m still pretty stuck.

Wall to vanity: Starts next to the door, ends next to the vanity Storage wall: Storage next to door (probably pretty narrow), then shower starts 12-18” in
50” long shower Shorter 36” shower
Only 27” deep Deeper (by several inches?)
Bench Bench would make it cramped
Single small cabinet is all the storage I can get, and maybe some nooks Cabinet for storage below, open shelves above
Room will look wider Room may look more narrow, but more space in shower
Will keep open look Room may look more/too crowded

I could also have the shower angle in, so that near the door its 27″ wide and then a foot in it widens. But that might look awkward. And it still leaves me without a ton of storage.

Thoughts? Especially on my Big Question? What do you vote for? And know of any vanities that meet my requirements?

P.S. My birthday was Friday! Look for two fun birthday presents that I’m super excited for, and the birthday present I made my party guests make for me!

P.P.S. Thanks to everyone who expressed concern about the Worst Birthday Ever. My mentee (from school, a 15 year old boy) was shot on Thursday, and I found out the morning of my birthday. His friend was killed in front of him, but he was just shot in the leg. It really scared me and shook me up, but I went to see him in the hospital on Saturday and he will be ok. Hopefully this taught him a lesson.

Color Wars

Things this post should be:

  • A reveal of the newly-painted buffet
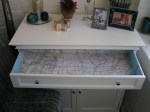
  • Adorably lined and repaired drawers
  • See how cute in my dining room!

Things it is instead:

  • Pictures of other people’s stuff.

Sigh.

When Lesley visited (almost two weeks ago), we* figured where better to spend the weekend than in a basement?

There is some cool stuff down there:

And the buffet is now mine. I think there used to be one of these in every unit in my building, and although simple, they are fairly well made and pretty. Not necessarily in the best of shape though…

While much of the finish was in good shape, there were enough spots that were in really bad shape that sanding and then re-staining was NOT going to be fun. The picture on the right is a long mirror (perched on top of the dresser in the first set of pictures) that is supposed to go on top of the buffet. It’s a pretty mirror, but I wasn’t positive I wanted it because it would make the (already big) piece (even) bigger.

Plus: You can see the bottom left corner was having some frame issues anyhow…no mirror fixing for us!

Minus: You can see the top left corner of the buffet doesn’t look quite right. That’s because there is a cutout in the back for the mirror to slot in to…that we weren’t going to use. Mirror fix, off the list; Gap fix, on.

We decided to go with a really deep navy, so that it wouldn’t be too much of a pop in the room, hopefully read pretty neutrally, and tie in with my dining room drapes:

And then they went and bought supplies and they sanded (and sanded and sanded. and melted.) and then they painted and then…

Yeah.

The sanding made it look like this:

And we bought a board (which was actually pretty complicated, since we needed exactly 1.75 across and pretty long) and patched the hole. We also patched the worst of the nicks and scratches on the top. And then we primed and painted.

So here is where you usually do at least a sneak peek….so, now for our (non) sneak peek:

(Not) ta-da!

Please go back and read above:

We decided to go with a really deep navy, so that it wouldn’t be too much of a pop in the room, hopefully read pretty neutrally, and tie in with my dining room drapes.

That’s Benjamin Moore’s Hale Navy. It reads very, very Americana-type blue to us. Sadly. Which does not match with my curtains at all. And before you go all, “Maybe you should do another coat?”…That’s THREE. 3. Its got a lot of gray it isn’t that dark, and it certainly isn’t navy like my curtains are navy. Our fault. Don’t pick paint so fast (we were just excited!).

So it’s close to being done (with repaired drawers, which hopefully my dad can help with Saturday) and new hardware, but I still need new paint.

I picked up my friend’s husband (such paint-choosing talent!) on my way home yesterday, and we hit the hardware store to try to fix this situation.

My thoughts:

  • Maybe what I want isn’t a very deep navy, its black with a lot of navy in it?
  • Can I just get something darker than my paint?
  • How do I make sure it doesn’t just look black (which I think would look funny with all of my dark wood)?
  • Why did I not just test first?

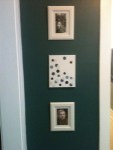
We found a “Greys” swatch that might have a couple options:

Benjamin Moore Soot (the lighter one)

Anna, who used it on the walls above, says, “I used Benjamin Moore’s ‘Soot’ with a matte finish. It’s actually the deepest, darkest indigo blue imaginable and not a true black, but that’s what gives it that extra oompf.” So thats a good sign, right?

Another option was Benjamin Moore “midnight dream”

…still looks kind of black.

But I liked this one:

Ooooh, and this:

They’re both Midnight Dream too. Funny, they look more like the blue I was going for, not that gray/black one above. Because it’s by Behr. Oh.

So, I think the color I like exists (maybe?). I know that the two BM colors have more parts black in them (we asked them to look up the formula). But I also doubt that a color that looks really dark blue in real people’s houses exists. I think I might take back my original (still mostly full) quart and ask for more black tint and try that out. And if it doesn’t I’ll buy new paint, by a different brand. On the plus side, the piece itself isn’t hard to paint at all—I’ll spend more time on clean up than I will on the painting.

LESSON LEARNED: Google image the heck out of the paint color you want to buy. You’ll see what it looks like, avoid an unwanted Happy-4th-Americana-blue moment and get other ideas from “liked this color but LOVED that.”

What was your biggest paint color mistake?

*ie Lesley thought I should wait before going after the bathroom walls with a hammer. But at least we shopped for tile!

Framing artwork

So Mary and I had our typical reunion weekend: We got our DIY on.

We spent some time talking about her bathroom and even went tile shopping.

And we spent a long, long time learning that navy blue looks very Americana on large pieces of furniture, rather than blue-black.

And we had some fun at the World’s Largest Block Party:

The lesson from this photo is: Don’t take a photo with your back to the sun.

And I had some great success frame shopping!

Over the last few months I’ve purchased two reprints of historical photos (from 20×200.com) A colorized photo of Paris during the 1890 World’s Fair and an early motion-photography series of an elephant walking. They both presented some framing challenges in that neither fit standard frame/matte size.

Let’s start with the Paris print. I found a frame that I loved at West Elm this weekend. I thought the neutral tones would look great with the old-timey sepia tones of the photo. But when I placed it under the matte, I saw this:

Big strips of white on the top and bottom.

At first I was really bummed. I love this frame and picture together, but I couldn’t see how it could work without a new matte. Then I realized I could just take a craft knife to a sheet of nice paper and make a little window. So I searched through my paper collection and found a sheet of creamy watercolor paper. I used a light pencil to trace the inner edge of the matte onto the paper, then I measure just far enough in on each side to cover the white (I had to come in on the non-white sides too, so it would look even). Then I used the craft knife and a straight edge to cut out the inner rectangle. I’ll admit—it took me a few tries to get the corners perfect and all the lines straight, but look at the final result:

I had a similar issue with the elephant print—we found the perfect frame last time Mary visited me. It was just the right proportion to fit the image, but we couldn’t find a matte to match. So I had a custom matte cut at Michaels. We did have a little mishap with the first matte—it was even around the paper, not the image—but Michaels redid it for free, which was great! Here it is with the standard frame and custom matte:

Perfect fit!

Now my only dilemma is where to put them. Right now I just have them propped against the walls in different rooms, which works fine for the time being.

A Better Bathroom: The Seeds of an Actual Plan

I’m out in Colorado for a few days to go through my grandparents belongings (they’ve both passed away within the last year). It’s nice to see family, although its definitely not a vacation. And to add to it, it looks like this:

Scary stuff—it’s been nine days and it isn’t even contained yet.

In all of my free time, I’ve been looking at pictures of bathrooms and discussing them with various family members.

  • I should do a shower and not a tub (everyone)
  • We can totally do plumbing.
  • And frame a wall.
  • And tile. (Uncle Rob)
  • Get a swinging glass door, not sliding (Aunt Sharyl)
  • Oooh, pretty tile (Cousin T)

These are the things I HAVE decided on:

Open shelves over the toilet

A shower (?!?! but I’m excited about it)

Cabinets above the door (I can only find pictures of shelves, but I want closed storage)

Glass swinging door on the shower (my Aunt Sharyl says she wishes that’s what they had instead of sliding, water on the floor and all. Sold.)

And then some things that are STRONG MAYBES:

A larger vanity base

With an open shelf on the bottom

A niche shelf in the shower

An accent band of tile in the shower, with either grays or blues

Plus some HMMM INTERESTING THOUGHTS:

Maybe dark wood base on the vanity (with a light colored top)

Some extra storage on one exterior side or the other of the shower, like this.

And things I really should have some concept of but have NO IDEA:

A medicine cabinet (I did like this oval frame one)

A new toilet (?!?! maybe I need one??)

What do you think? Are you on board with my shower-only craziness?

A Better Bathroom: A Wrench in the Works (er…my mind)

Most of the delay in fixing the bathroom is my own indecision. I have the money saved up, I’ve been pinning ideas, I even have the tub picked out.

Except.

Do I need a tub?

Before you answer, hear me out. I was talking with a neighbor and her husband and we were talking about how we don’t take baths but we still need to have a tub “for resale.” Which is a good point: Do people really want to buy a place without a tub? Keep in mind, my condo is a 1-bed, 1-bath. Most adults do take showers instead of baths. I realize I would be turning off some potential buyers when I want to sell, but how many?

Here’s the thing: One of the biggest reasons people want a tub is that kids don’t take showers. You have to put them in a bathtub. But I’m pretty sure nobody has a baby in a one bedroom on purpose. And if they do, they have almost two years to go find something fit for a family (because the baby doesn’t go in a tub right away; you use a baby tub, or so says my mother).

I’ve never been excited to take a shower in a bathtub, no matter how fancy (and mine? Won’t be fancy. Tiny bathroom, remember?). But a shower? My best friend has an AWESOME shower. It has a regular shower part and then a rain shower and then four body jets and also a steam shower. And a bench. The whole show is oriented about 8 in. too high for me, since they are both tall and I am not. But still. Every time I watch their cats, I’m all excited to go over there and shower and then glare at the tv because I’m never entirely sure how to work it so I can’t actually watch. But the point is, the shower is really nice.

So, I would probably be all excited to take a shower in my nice new bathroom, but not to have a nice new (little-ish) bathtub. And then I could have a larger vanity, and the shower would be nice. And some people (but really, how many?) would be like, “Huh, this place doesn’t have a tub. What were they thinking? Next!” but other people would be like, “That shower looks awesome. I never take baths anyhow.”

I was going to put pictures in here, but that really isn’t the point. People have plenty of bathrooms with just a shower, the issue here is to ONLY have a shower.

What should I do?!