Spaghetti Squash with Lentils de Puy, Kale, and Feta

Spagetti Squash


You know all those Pinterest post that try to convince you that spaghetti squash is the perfect substitute for pasta? I’m going to tell you something: They are lying. Spaghetti squash is stringy like spaghetti, and it can work really well with some sauces, but the texture and moisture levels are completely different.

Instead of pretending spaghetti squash is something it’s not, let’s embrace it for what it is: A really easy to prepare food that can add an exciting taste, color and texture to your recipe. And, it’s pretty dang healthy.

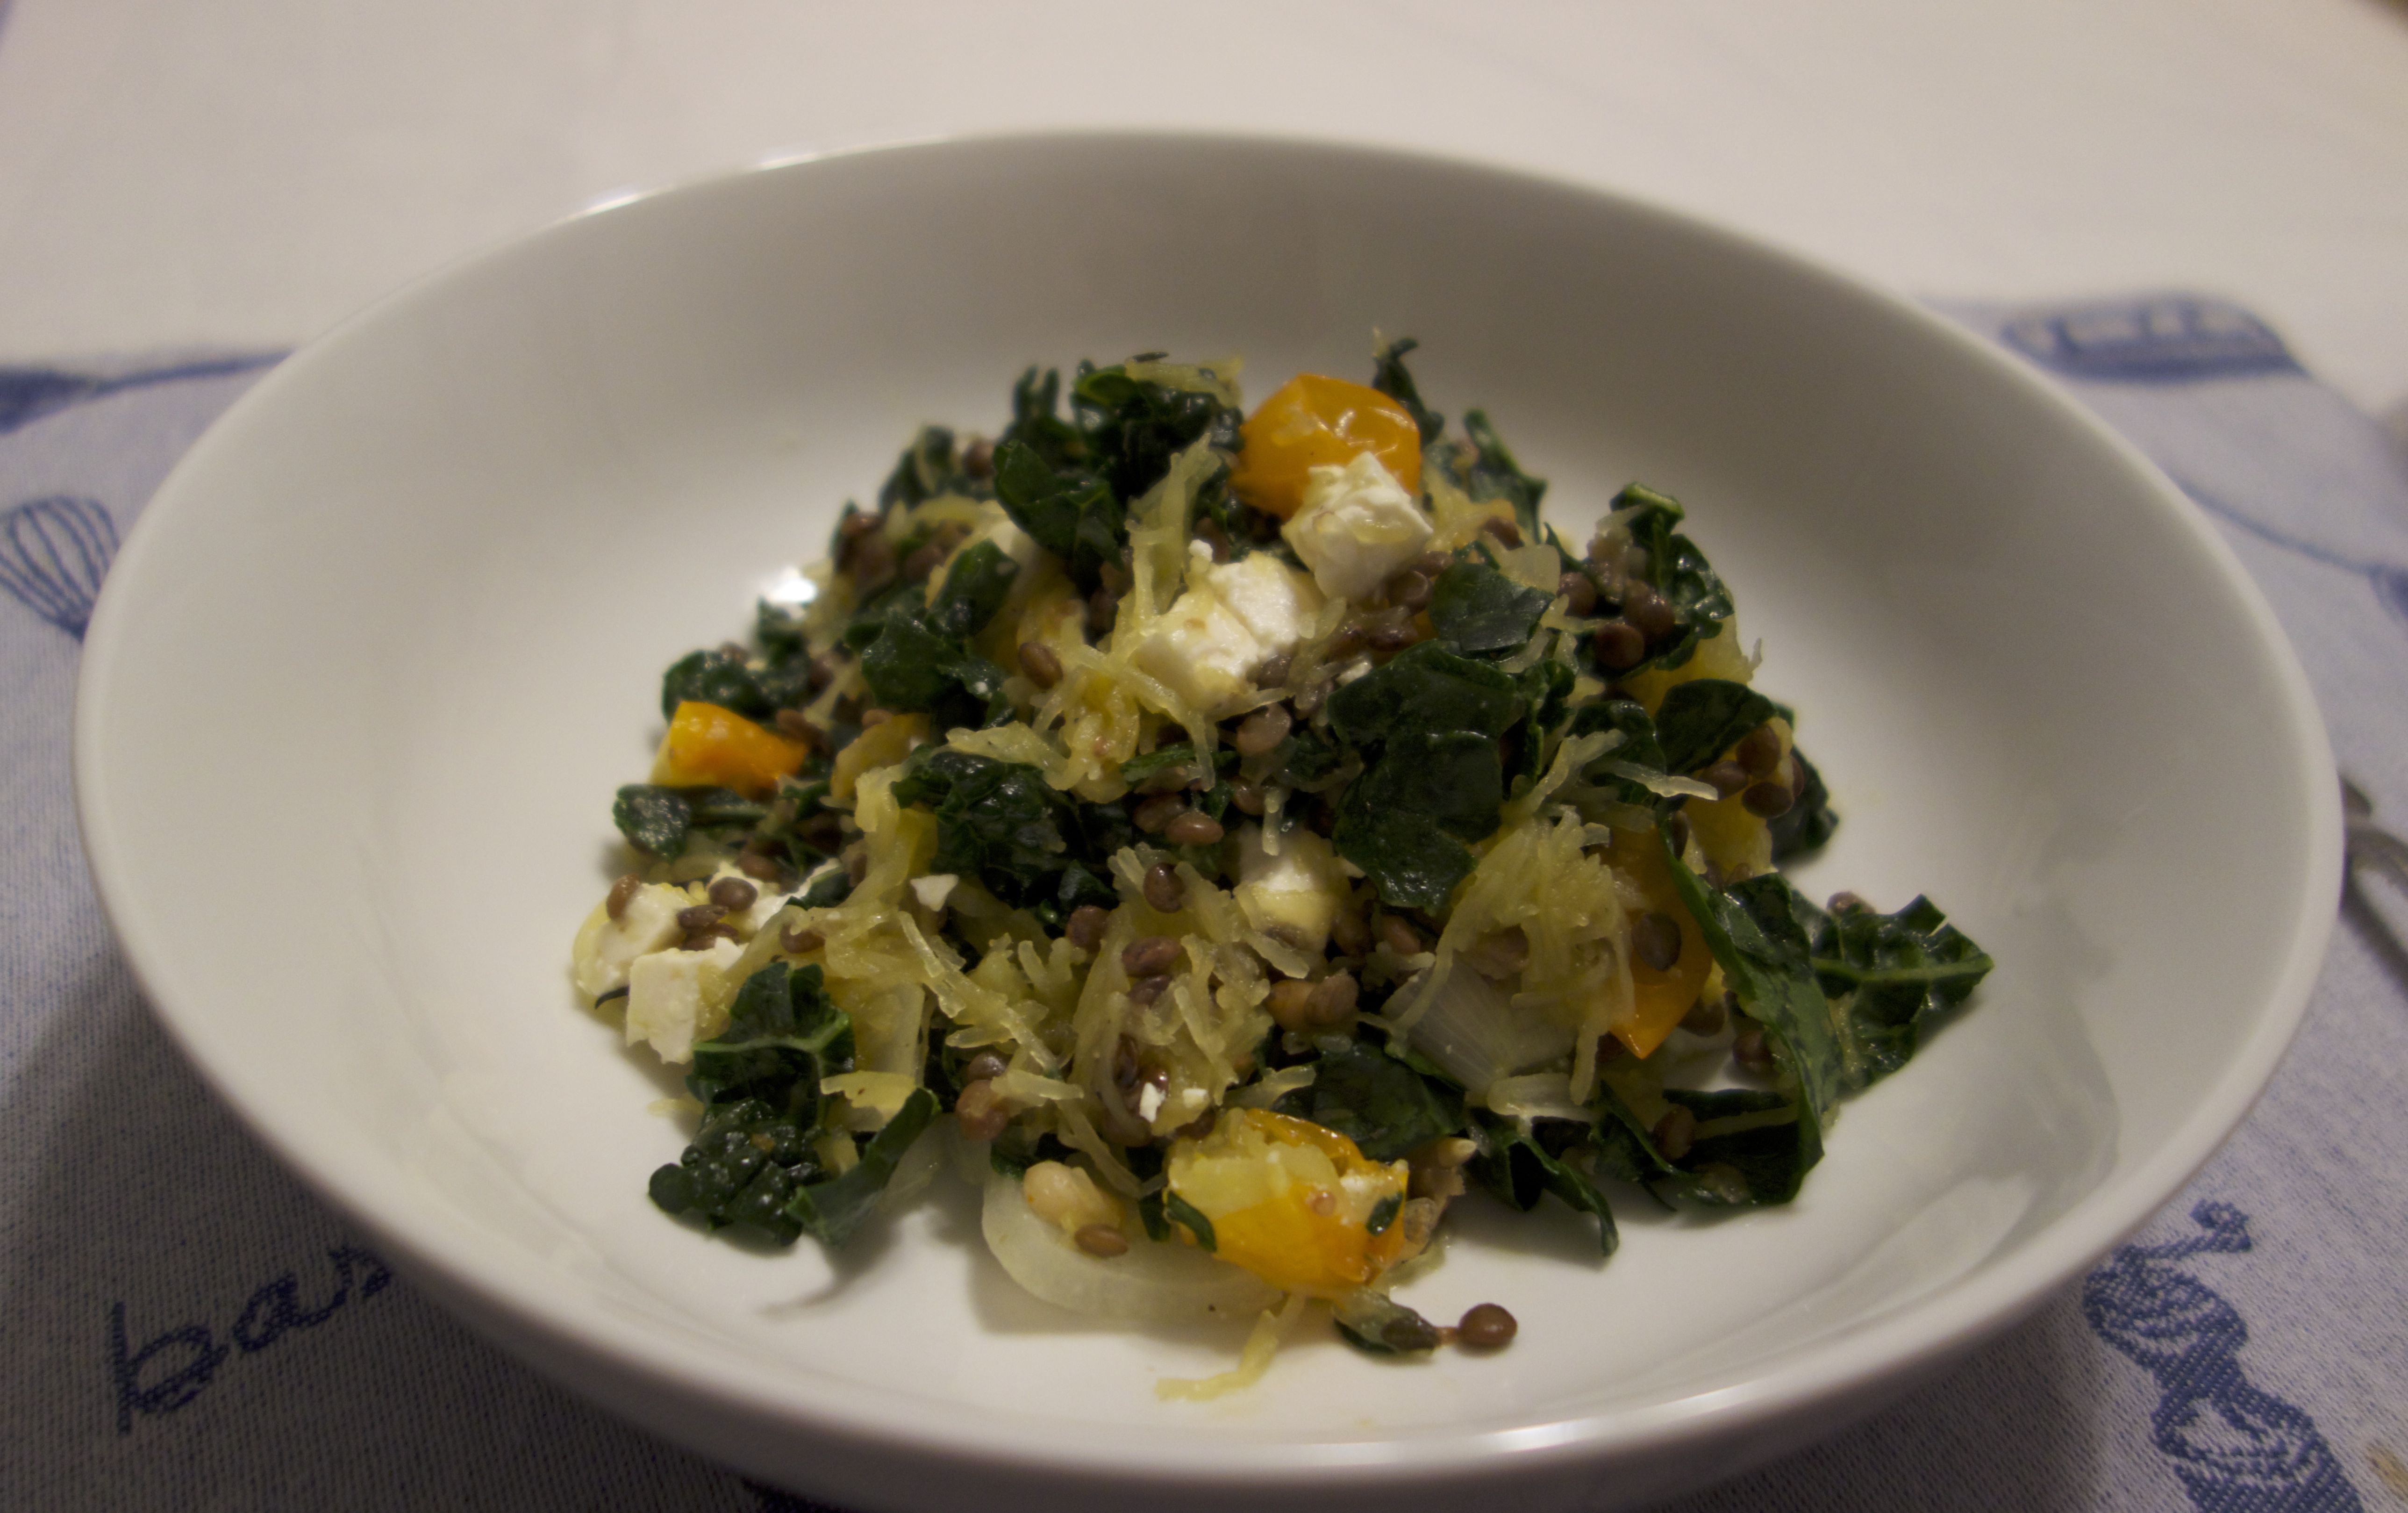
For this recipe, I tried to balance out the lighter squash flavor and texture (spaghetti squash doesn’t have nearly the same flavor presence as pumpkin or butternut squash) with taste and textures that were both earthier and sweeter. I’m really happy with the results, which make a very satisfying main dish for vegetarians.

Spaghetti Squash with Lentils de Puy, Kale and Feta

Ingredients

  • 1 large spaghetti squash
  • 3 tablespoons olive oil
  • 1 teaspoon seasoning salt or seasoning blend with salt and paprika
  • 2 cups water
  • 1/2 cup green lentils de Puy
  • 1 small bunch laminate kale or other hearty green, sliced into ribbons.
  • 1 pint grape or cherry tomatoes (I used yellow), cut in half
  • 1 small onion, sliced
  • 1/3 cup crumbled or diced feta
  • Handful toasted pine nuts (for garnish, optional)

Directions

  1. Preheat the oven to 350° F. Cut the squash in half lengthwise and scoop out the seeds. Mix 2 tablespoons of the olive oil and seasoning salt in a small dish. Generously brush the mixture over the inside edges and scooped out center of the squash (you do not need to coat the rind). Pour any extra into the centers of the hollowed out halves. Wrap each half in tin foil and bake in the oven, cut side up, for 40 minutes.*
  2. Combine lentils and water in a covered pot over high heat. Bring to a boil, then turn the temperature to low and simmer for 30 – 40 minutes, until the lentils are soft. (Unlike other lentils, green lentils de Puy will retain their firm shape, so remove some with a spoon to test.)
  3. While the lentils are cooking, give the kale a bit of a massage (you do not need to do this with other greens), rubbing the ribbons together with your fingers until they are soft. I can’t eat raw kale, so I added it to the lentil pot to steam just as the lentils were finishing, and let it sit in the hot pot with the lid on until I was ready to add it to the squash. If you prefer raw/massaged kale, you can skip that step.
  4. In a large pan, heat the remaining oil. Add the onions and sauté until soft, then add the tomatoes and continue to cook over medium heat.
  5. Remove the squash from the oven and carefully open the packets, taking care not to drip out the oil. Using a fork, flake and scrape the inside of the squash, which should easily form long strands. Add to the mixture in the pan, and pour in any leftover oil.
  6. Add the lentils and kale to the pan, straining out any excess water. Use a large serving fork or tongs to gently mix the ingredients. Top with the crumbled feta and pine nuts. Serve immediately.

* If it’s warm enough to grill, there’s an a wonderful alternative way to prepare the squash using the same three ingredients. Mix the oil and seasoning salt as above, but instead of slicing the squash in half length-wise, cut it half so the stem is on one half and the bottom the other. Scoop out the seeds, then slice the squash into large rings, about an inch thick. Brush all the exposed parts of the flesh with the oil mixture, and cook it on a hot grill. On the grill, it gets some nice caramelized pieces. You can use a fork to pull the strings from the rind, just as with the above method.**

** As another alternative, you can make tinfoil packets and throw those on the grill. Grilled spaghetti squash is one of my dad’s specialties!

Plum Poppy Seed Pancakes

So, given my inability to cook foods that require flipping, you’ll have to disregard the ragged appearance of these pancakes and trust me when I tell you they are phenomenally good. Fluffy and fruity and full of flavor and the type of carb-y comfort food goodness you want on a winter morning.

stack of pancakes

(I know, I know…another horrible pic. Again, iPhone.)

It all started with a big bag of plums I had. I couldn’t figure out what to do with them. I didn’t really have an occasion for plum cake and I wasn’t in the mood for a crisp, but pancakes sounded divine. And poppy seeds seemed like the perfect addition.

Plums Poppyseeds

In addition to not looking great in a stack on a plate, the pancakes also do not look great when you pour the batter into the pan. That’s because there are lots of slices of plum in them.

Pancakes in Pan

It actually looks like I’m frying them here, but that’s just the juice from the plums reacting to the butter — you only need a little butter or oil at the bottom of the pan, just like with regular pancakes. Trust me, this is one of those projects that seems like a total disaster until you take the first bite. Then, yum!

bite of pancake

Plum Poppy seed Pancakes

(as per usual, I adapted a basic recipe from the New Settlement Cookbook to suit my needs)

Ingredients

  • 3-4 small plums, cut in half, pitted, then finely sliced.
  • 1 tablespoon poppy seeds
  • 1 teaspoon cinnamon
  • dash nutmeg
  • 1 1/2 teaspoon baking powder
  • 1 cup sour cream
  • 2 eggs, lightly beaten
  • 1 cup flour (I used whole wheat pastry flour)
  • 1 tablespoon melted butter

Directions

  1. Sift together the dry ingredients into a large bowl.
  2. Add the sour cream, eggs and butter, stirring until just mixed after each addition.
  3. Gently fold in the sliced plums and poppy seeds.
  4. Heat a griddle or non stick pan with a little bit of oil or butter, lightly coating the pan. The pan is ready when you can sprinkle a little water from your fingertips and it immediately sizzles, but doesn’t evaporate on contact.
  5. Carefully pour your batter into the pan. I used about a quarter cup for each pancake. Cook until the surface is covered with bubbles, then flip and brown the other side.
  6. Remove from pan and repeat step 5 with remaining batter.
  7. These are fantastic with butter, syrup, jam, etc. They also freeze and reheat well (I’ve tried both a microwave and a toaster oven successfully).

Bon appetite!

Frittata: Easier than an omelette

Here’s a secret—I have really bad luck with a few breakfast dishes, mainly the ones that require flipping. I’m flipping challenged. So my omelettes always end up broken and really turn into a hybrid halfway between scrambled eggs and omelettes. I mean, they generally taste good, but I’ve yet to master the skill of creating a perfect omelette folded around a delicious filling. That should actually be a New Year’s resolution this year: I will conquer the omelette in 2014!

But, anyway, in the meantime, while I’ve been omelette challenged, I’ve gotten really good at a few egg dishes that don’t require flipping, especially frittatas. Chances are, you’ve probably had a frittata, even if it was called something else, like a baked omelette or crustless quiche or torta. It’s basically whatever fillings your heart desires, mixed with eggs, and topped with cheese. You start it on the stove and finish in the oven. I’ve seen recipes that call for six eggs and a little cheese and broccoli and I’ve seen recipes that call for three eggs and a million vegetables—the egg to filling ratio is really based on preference, and in my, case, often what I have on hand.

Here’s the first step of a frittata I made the other day:

Frittata ingredients

I started by preheating the oven to 450 degrees and heating a little bit of olive oil and about a tablespoon of butter in my 8-in. cast iron skillet (Hey, Mary, look – I still use the skillet you gave me when we were in college!). Then I added one small baking potato, thinly sliced, a teeny onion and about 4 oz. sliced mushrooms. Plus some salt, pepper and dried basil. I sautéed over medium heat until the potatoes were soft and the onions were starting to caramelize. Then I added my greens, in this case, some roughly chopped Lacinato kale (the nice thing about kale is that it can stand up to the eat without melting away to mush. More tender greens, like spinach or arugula, are going be much softer).

Then it was time to add the eggs. I used three eggs, whisked together with about a quarter cup of milk. Then I added it to pan. I let it cook stovetop on the pan, while I grated a little cheese (Swiss on this particular day). Then I sprinkled the cheese on top, and, using an oven mitt, moved the skillet to the oven.

I check on it regularly, since the time on the stovetop can vary a bit. I like my frittata nice and golden on top, but I know other people love them soft and barely set. Mine took about 20 minutes in the oven.

Frittata in pan

Gorgeous and delicious! If you are looking to be fancy, you can invert the pan over a platter (after loosening the frittata with a spatula) and it will fall out just like a cake. Since it was just me, I simply cut myself a generous slice right from the pan.

The leftovers are pretty good the next day, but not for much longer after that. Much like a quiche, you’re filling ingredients are only bound by your imagination, and while I mentioned breakfast at the top of the post, there’s no reason this can’t be a nice dinner as well.

Some updates

It’s been a while, hasn’t it? Sorry about that! It turns out that managing three blogs at work means that I’m less inclined to work on my own blog at home (go figure). But that’s going to change in 2014, I swear!

Some exciting changes here. For one, I got a new camera! It’s a Sony Cybershot Mark 100, which is a compact, fixed-lens camera, but with an incredibly powerful lens and sensor. I wanted a small camera for travel, but didn’t want a mediocre point and shoot. So far, I’m really happy with the purchase. I took it with me on my recent vacation (I went to Paris. Everything people say about it is true.) and got some great pictures with it. I do have a few catch-up posts to share, which will still feature less-than-perfect, step-by-step iPhone pictures, but after that you should see a noticeable improvement in photo quality. If anyone is interested in how I went about choosing my camera, leave a comment and I’ll do a post. I did a lot of research ahead of time and went to about 5 stores to look at cameras in person (I research things to death when I make a large purchase). Otherwise, I’ll assume you get your camera advise from a camera expert!

Some other exciting things you missed:

I made this cake for my sister’s birthday. It was ridiculously good and impressed everyone who ate it, even those who ate smooshed leftovers out of a tupperware three days after her birthday.

susan's birthday cake

At one point my vegetable garden was producing crops like this on a daily basis (this is my share, after giving the upstairs neighbors their share):

veggies from garden

I can’t wait to start planning for next year’s garden, and I’m hoping to share some of the stuff I learned having a vegetable garden for the first time.

And at one point, my living room looked like this:

Brown Living room

In an attempt to try something new, I painted the living room a nice cozy brown (Basketry, by Behr). I actually still really like this color. It’s a great mid-tone neutral—not too green or too red, in my opinion. But, with the wood trim and floors it was a lot of brown. Then I bought a brown couch (not what I intended at all—I’ll definitely share my couch saga soon!), and a too low coffee table and the room slid into a horrible state of Not Working At All. So, aside from the couch (which I LOVE), it’s completely different!

Oh, and I bought these insanely girly hooks for $2 each at Anthropologie. Everyone who saw them on my counter said they were really flowery and looked like they belonged in a little girl’s room. Everyone who’s seen them on the wall  (they  in my back hallway next to the door) has complimented them. Girly can totally work in a grown up house.

girly hooks

So that’s what’s been happening here. More to come soon!

Slow roasted tomatoes – from the garden

I planted a garden this summer. A huge garden. Then I waited.

Gardening is all about patience. And weed control. If you’re trying to reclaim an overgrown patch of yard, there is lots of weed control.

But, back to the patience…I planted five tomato plants in May, and in late July I started to see a few teeny tiny results.

three tomatoes

But then, a month later, I suddenly was seeing results like this

IMG_0613

Every week. For going on 5 weeks now. So in addition to making sauces, caponata, and a bunch of other old favorites, I was looking for new ways to use tomatoes. And I found an awesome and easy recipe with spectacular results: Slow Roasted Tomatoes.

sundriedtomato


This is one of the easiest things I’ve ever made. Doesn’t even need a formal recipe.

Set your oven to 250 (225 for smaller tomatoes, like cherry tomatoes). Cut the tomatoes in half. Place on lined baking sheet. Splash with a tiny bit of olive oil and perhaps some balsamic vinegar. Sprinkle with a little salt. Let it slowly roast in the over for three hours or so — till they shrink a bit and start to look a little dry.

They taste fantastic — sweet and intensely flavorful. You can add them to dishes like pasta. I simply stacked them on a piece of french bread with a slice of soft mozzarella. Heavenly.

IMG_0607

Baking with Whole Grains

Over the course of the 100 day challenge I did with my cooking group, I did a lot of experimenting with whole grain baking. I’ve finally reached a point where I feel comfortable doing most of my baking with whole grains, but I learned quite a few things along the way, including:

  • Most whole grain recipes call for a mix of whole grain and refined flour, much like many store bought items that say “with whole grains” are a mix of whole grain and refined flours.
  • A straight substitution of whole grain flour results in a very different texture, which can be much denser, with a thicker crumb.
  • Whole grain pastry flour is a great alternative to heavier whole wheat and it’s worth it to learn when you like using each.
  • If you are going gluten free, buckwheat, oats, rice flour, amaranth, almond and more are there to experiment with! Some give a nuttier flavor and denser feel while others are more cake-like.

As for specific recipes, here’s what I’ve found when making substitutions:

  • Muffins and quick breads are extremely compatible with flour substitutions, especially moister breads (like banana or zucchini). For example, in my usual blueberry muffins, I subbed whole wheat pastry flour and used almond flour for the topping with great results. I had a lot of fun experimenting with banana bread, which might be the most forgiving quick bread of all. First, I used my family’s go-to recipe from The Settlement Cookbook and used half whole wheat and half rolled oats instead of regular flour. Then I tried Smitten Kitchen’s crackly banana bread and used a mix of buckwheat, flax meal and whole wheat flour (instead of millet, which I didn’t have on hand, I used a mix of chia hemp and buckwheat seeds (a cereal mix available at Outpost).
  • Regular pancakes retain much of their texture with whole wheat pastry flour, but experimenting with variations like buckwheat crepes (flatter and nuttier) and oatmeal pancakes (much fluffier) is worth a try.
  • It is a lot harder to blend a smooth pie crust with whole wheat pastry flour. It takes longer to get an even consistency and it cracks more easily when you roll it out and transfer it to the dish.
  • Flour substitutions in cakes require more thought than anything else. I haven’t found a good substitute for cake flour. The good news is that there are plenty of excellent cakes that are designed around special flours, such as almond flour or corn meal. And for denser, richer cakes, like chocolate, using whole wheat pastry flour or another heavier flour might actually help the cake achieve the right texture without freezing (yes, some layer cake recipes suggest freezing the layers to achieve the desired texture).

As I mentioned above, I’ll probably continue to nix the refined flour for a lot of my baking — particularly muffins, scones and quick breads, because I prefer the texture with more natural flours. And, in fact, these are also the recipes that I’ve found to work best with natural sweeteners like maple syrup, honey and various raw sugars like date, coconut palm and sugar cane.

The one area where I might be inclined to “cheat” post-challenge would be with chiffon cakes and some sponge cakes. I haven’t been able to find a less-processed flour that achieves the right texture, and texture is important for these particular types of cake. Beaten egg whites just can’t hold up to the weight of some of these flours as well as others.

So that’s it: My findings on baking with whole grains. Of course, it’s very much based on my personal taste. Have you been baking with whole grains? What results have you seen?

Breakfast on the go, time two

Breakfast has, by far, been the easiest meal for following the challenge rules. I’m one of those people that MUST have breakfast. My day doesn’t feel like it’s started without it, and I’m pathetically inclined to get cranky a few hours into the day if I skip it. That said, time is at a premium before I head out the door to work, so anything I can prep in advance and grab on the way out the door is wonderful.

I found two great recipes from The Smitten Kitchen Cookbook, that with very slight tweaks (subbing in a whole grain in place of wheat germ or whole grain flour in place of all-purpose), are perfectly challenge-friendly, very tasty and ready to grab on the way out the door.

First up – Almond Date Breakfast Bars

Ingredients

1 1/4 cup rolled oats

1 cup pitted chopped dates

3 tbl whole wheat flour

1/3 cup milled flax seed

1/2 cup sliced almonds

1/2 tsp salt

1/4 tsp cinnamon

1/4 cup almond butter

1/4 cup olive oil

1/4 cup honey

freshly grated orange zest

1/4 tsp almond extract (optional)

Directions

1. Preheat the oven to 350 and line an 8×8 square pan with parchment paper, taking care the the paper extends up all the sides.

2. Combine the first seven ingredients in a large bowl and mix together.

2. Combine the remaining ingredients in a separate bowl (I just used my liquid measuring cup so I didn’t have to scrape it out repeatedly).

3. Add the liquid ingredients to the dry and mix until coated.

4. Press the mixture into the pan evenly. Bake for 20 – 25 minutes, until lightly golden.

5. Let the bars cool until they feel more solid than crumbly (putting them in the fridge once they’ve cooled to room temperature might help). Remove from pan and cut into nine squares.

Next – Maple Oat Granola

I like to throw this on top of Greek yogurt (sweetened with a little honey on the bottom of the bowl)

Ingredients

3 cups rolled oats

1 cup unsweetened shredded or flaked coconut

1 cup chopped walnuts

1/4 cup flax seed mill

2 tbl olive oil

1/2 tsp coarse salt

1/2 cup or more maple syrup

1/4 tsp cinnamon

1 large egg white

1 1/2 cups dried fruit (cherries or berries seem to work best)

Directions

1. Preheat the oven to 300 F. Line a jelly roll pan or cookie sheet with parchment paper.

2. Mix all the ingredients but the egg white and fruit until well combined.

3. Whisk the egg white until it’s slightly foamy, them add to the mixture, stirring until evenly coated.

4. Spread in an even layer in the pan.

5. Bake for 45-55 minutes. Check 20 minutes in and turn sections of the granola if they appear to be brownings (I’ve never remembered to do this, and they’ve turned out fine.

6. Once light golden brown on top, remove from oven and let cool.

7. Sprinkle with fruit, then remove from pan (breaking it up as much as you want) and transfer to an airtight container for storage.

Even after the challenge is over, I think I’ll be making both of these on a regular basis.

Red Lentils and Potatoes with Spicy Tomato Sauce

I’ve been doing a 100 Days of Real Food Challenge with my cooking group. No processed food, no refined sugars or flours, etc. Basically, it means eating as close to what Mother Nature provided as I can realistically get. Pretty challenging, as it turns out. Some things, like eating whole grain instead of refined grains, are easier, while others, like trying to bake without refined sugars, is pretty hard (totally changes the texture). I’m mostly doing it out of solidarity with the group – some people are trying it as a real lifestyle change, to eat healthier.

One thing I like about it, is that it challenges me to try new ingredients and new recipes, and I’ve discovered some new dishes that I really enjoy – like this red lentil dish.

Red Lentils and Potatoes with Spicy Tomato Sauce

  • 1 small yellow onion
  • 2 cloves garlic
  • 5 small red potatoes
  • 3 tablespoons olive oil
  • 1/2 tablespoon oregano
  • 1/2 teaspoon turmeric
  • 1/4 teaspoon chili powder
  • 1/4 teaspoon ground coriander
  • 1/4 teaspoon curry powder
  • 1 cup red lentils
  • 5 ripe tomatoes or 1 15 oz can organic tomatoes
  • 1 bunch collard greens or kale
  • about 2 cups water (or vegetable stock)
  • salt and pepper to taste

Directions

  1. If using fresh tomatoes, dice them, reserving the seeds and juice along with the pieces.
  2. Scrub and finely dice the potatoes. Dice the onion and mince the garlic. Heat the oil in a 4-5 qt pan over medium heat, add the seasoning, and sauté the potatoes, onion and garlic until the onions start to soften.
  3. Rinse and sort the lentils, if necessary, and add to the pan. Stir in the tomatoes. Add enough water to cover the ingredients in the pot. Cover, and let simmer for 30 minutes.
  4. Rinse and slice the greens into ribbons. Add to the pot when the 30 minutes are up, stir in, and simmer, uncovered, until the potatoes are fork tender and the lentils are soft and fluffy.
  5. Season with salt and pepper and serve immediately.

Pork Apple Cheddar Meatballs


This is one of my go-to dinner recipes, found during the year I had a subscription to EveryDay with Rachael Ray.

Pork, Apple & Cheddar Meatballs

Pork Apple Cheddar Meatballs

They’re oh-so-good, and pretty quick and easy too.

Meatball Ingredients

Ingredients

  • 1 pound ground pork (my local grocery has it already packaged in a casing)
  • 1 cup coarsely grated sharp cheddar cheese
  • 3/4 cup breadcrumbs
  • 1 small, tart apple, such as granny smith, peeled and grated
  • 1/2 small onion, grated
  • 1/2 cup chopped parsley
  • 1 egg, beaten
  • Salt and pepper
  • 1 12 ounce package  egg noodles
  • 4 tablespoons butter, cut into pieces
Directions

  1. Preheat the broiler. Line a rimmed baking sheet with foil and grease with butter. (I spray mine with my magical oil sprayer)
  2. In a large mixing bowl, combine the pork, cheese, breadcrumbs, apple, onion, 3 tablespoons parsley, the egg, 1 1/2 teaspoons salt and 1/4 teaspoon pepper. (This is: everything but the noodles, butter and some of the parsley.)
  3. Meatballs ready to mixMix it up with your hands. Ew, squishy.
  4. Meatballs mixedShape into 16 meatballs and arrange on the baking sheet. Broil the meatballs until golden and cooked through, 8 to 10 minutes.
  5. Meatballs cookedMeanwhile, in a pot of boiling, salted water, cook the noodles until al dente. Drain, then return to the pot and toss with the butter and remaining 5 tablespoons parsley; season with salt and pepper. Divide the noodles among 4 plates; top with 4 meatballs each.

Bonus points if you make extra and have lunch for the next day!

Pancake Mix

I love pancakes. Nice real fluffy ones, with some taste to them. Ideally with mini chocolate chips.

Pancakes Final

In junior high home ec class, my teacher had a cookbook (from the 70s) called Make a Mix Cookery. Being the cool junior high schooler I was, I was obsessed with this book. I thought it was the coolest thing ever. You could just MAKE MIXES. You didn’t have to buy mixes OR make things from scratch. Magical!

Now it costs 4 times retail on Amazon. But I bet its still awesome.

Now it costs 4 times retail on Amazon. But I bet its still awesome.

My mother, sensing an opportunity, got it for me for Christmas. Not the vintage 1978 edition but the current one (current at the time, which means I have the 90’s edition and the new one is from 2006. But I’m sure its still awesome!)

MakeaMix

I’ve really only used four mixes from the book, but two of them are such standbys it has more than paid for itself. My favorite (and a recipe I’m known for) is buttermilk pancake & waffle mix.

Pancake Mix Ingredients

Ingredients:

  • 2 cups dry buttermilk powder (I use Saco brand, in the center below, which is available at both major grocery stores in the area)
  • 8 cups all purpose flour
  • 1/2 cup sugar
  • 8 teaspoons baking powder (which is 2 T + 2 t)
  • 4 teaspoons baking soda (which is 1 T + 1 t)
  • 2 teaspoons salt (that’s, um, 2 t)

Directions: Put in large bowl (mine is a 5 qt, which is the largest I own). Stir together with a whisk to really mix it thoroughly. I always do flour and sugar first, because the buttermilk powder can stick to the sides of the bowl a bit. And I mix the little dry ingredients in with a partially dumped cup of flour because I think they blend better that way. But I may be making that up.

After the mix is done, I put in the medium rubbermaid.

After the mix is done, I put it in the medium Rubbermaid canister.

Making the mix takes ten minutes tops, so its really easy–but even ten extra minutes is no fun when you just rolled out of bed on Saturday morning and want some breakfast. Which is why this mix is so awesome–now its like making Bisquick but better!

Just add:

  • 1.5 cups mix
  • 1 cup water
  • 2 Tablespoons oil
  • 1 egg

Making PancakesAnd mix! I leave a 1/2 cup scoop in my mix, so its just three quick scoops, then a cup of water and 2 tablespoons of oil. If I’m feeling fancy I crack the egg into the empty measuring cup and beat it quickly, but usually it goes right in the bowl. Mix until its all incorporated, but not any longer than you need to, scraping down once or twice for lumps.

THEN turn on the stove. You can go wash your face or something now–leaving the batter to sit for a couple minutes while the pan is warming up gives the baking powder and buttermilk powder a chance to activate and make your pancakes fluffy and delicious. T

Pancake Mixed

You can see the bubbles trying to rise to the surface in this bowl that has been sitting for about three minutes.

These are a specialty on church retreats, and I always bring my own pan AND make a test pancake (why, yes, people do tease me for this. But they also love my pancakes). On my own stove I don’t need to make a test pancake, because I know that 7 is the right setting, but its well worth the time. Know when to flip! The test I always do is to throw a little water on the pan. Its never a good idea to put food (of any type) on a pan that isn’t finished heating (you won’t notice as much with a nonstick pan, but that doesn’t make it a good idea). If the water sizzles and evaporates, the pan is ready for some pancakes. If it takes a little bit, adjust the heat if needed or just be patient. It will be warm soon.

If you have any mix-ins (mini chocolate chips! blueberries! walnuts!) throw them in now. I actually don’t do them all at once, and stir IMMEDIATELY before pouring–otherwise they just sink, so the first one will have three sad little mini chips and the last one will be chips barely held together by trace amounts of pancake. It isn’t cookie dough–batter doesn’t suspend things well. So I throw in a small handful of mini chocolate chips, give it a quick stir with my scraper and pour out some pancakes.

Pancakes Ready to Flip

I love my square pan. Much better than the pair of 8 inch fry pans we used our first semester in our college apartment.

They are ready to flip when you see a good number of bubbles, as above.

Pancakes Cooked

Delicious! Keep a plate on an adjacent burner to stack up the pancakes on–and if something is in the oven, close to the vent. The added heat will keep them warm and ready.

What’s your favorite breakfast food? Pancakes? Eggs? Bacon? (I can’t even make eggs–that’s what Lesley or Boyfriend are for!)