What I Got: Lesley

It’s a little late for a Christmas post, but since I’ve been away from the blog for awhile, I thought I should add my holiday recap.

Out Christmas was very relaxed and peaceful this year. We spent Christmas Eve with my “faux” family (my mom’s best friend’s family). It was great, with kids running around, our usually grab-bag gift exchange (everyone brings a present worth $25, we draw numbers and pick gifts in numerical order), and this year we did soup. I made Russian Mushroom Barley soup, which I thought turned out pretty good (not quite as good as the Soup House at the Milwaukee Public Market, but pretty tasty). My cousins, Andy and Kim, did a Lobster Bisque that was knock-your-socks-off good. And my Aunt Susie made a split peas soup, and cousin Matt made…some other soup with meat that I also didn’t try. But it was also good. So yay for fun family time with tons of yummy food!

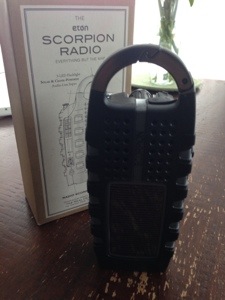
I got this fancy no-batteries-required radio/cell phone charger in the gift exchange. I really like having it as part of my bad weather/zombie apocalypse survival kit.

20130121-153115.jpg

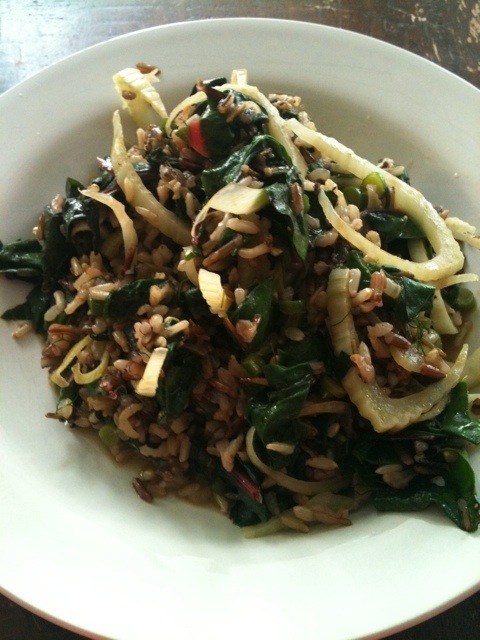
The next day we woke up, waited for my sister and her fiance to arrive then enjoyed crab cakes benedict and my dad’s fried potatoes for breakfast. It was fantastic, but we really needed something green to go with it! Very heavy breakfast.

We opened gifts and just lazed around for most of the day. My favorites included:

Noise canceling headphones (I sit next to a very noisy group at my new job)

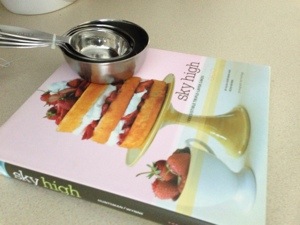
Stainless steel measuring cups, with the measures engraved on the handles instead of printed (These suckers will last me forever, unlike my last plastic set, which lost both labels and entire handles due to heavy use).

Sky High: Triple Layer Cakes (I need occasions to bake for now because these look fantastic).

I also got a lot of little odds and ends for my gym bag, cute homemade pajama pants from my mom and a few other odds and ends.

Hope your holiday season was also filled with lots of merriness.

20130121-153050.jpg


Advertisement

Christmas Cookie Exchange

Last week was a big week for me in the holiday entertaining department.

On Tuesday, I hosted my sorority’s annual holiday cookie exchange. Our best turnout year had over a dozen people, but this year was a paltry four. One girl made Snickerdoodles, another made peanut butter cookies and the third made potato chip cookies. The potato chip cookies were pretty interesting (a hint of saltiness)–I’d heard of those before but never tried them.

It’s a super simple party to throw–evite, get some drinks (I just did hot chocolate, and everyone only wanted water) and remind people to bring copies of their recipe and an empty container for all their cookies!

I made a recipe Lesley pinned from Recipe Girl for Peppermint Sugar Cookies.

Recipe Girl's Peppermint Sugar Cookies

Recipe Girl’s Peppermint Sugar Cookies

They turned out pretty well. I wasn’t totally in love, but I liked them, and they look really pretty. After reading the reviews I subbed granulated sugar for some of the powdered sugar. It worked fairly well (but its not like I know how the recipe would work as written).

I served hot chocolate and we sat around and chatted and snacked on cookies before we exchanged. This was also a great plan for holiday party prep–I scheduled it so that I could use my cookies for dessert at my Christmas party on Saturday.

What’s your favorite kind of cookie?

Cooking from a CSA, Part 12: Homemade Vegetable Stock

Remember back in the summer, when I said I was saving vegetable scraps in the freezer to make vegetable stock? I finally got around to doing just that.

It was really easy. First, I put a little olive oil in the bottom of my stock pot. I heated that on medium, and added all my onion and garlic type scraps (leeks, onion pieces, garlic scapes). I stirred that until it was soft (about 10 minutes), then I added some of my tougher or more fragrant scraps, such as carrots, celery and parsnips. I let that cook for another 10 minutes, then just covered everything with water. I let it come to a boil, them tossed in some of my softer scraps, like salad scraps (lettuce, radishes, tomatoes). I added just enough water to cover, and let the whole pot simmer for about 45 minutes. Then I turned off the burner and let it cool.

Once it was cool, I ladled it into appropriately-sized freezer containers, straining it through a fine wire mesh as I poured. I got about 5 1.5-cup containers worth of stock. I froze three of them and used two within the next few days, and they’ve worked great for everything from soup to risotto. For things like risotto, I let the stock thaw in the fridge for 8-24 hours before using, but when making soup, I just tossed in the giant ice cube.

Cooking from a CSA, Part 11: Easy Fall Salad

My most recent CSA box had a great selection of fall vegetables and lettuce greens. This salad was an easy make-ahead recipe that I ate all week. I roasted beets by wrapping them in tin foil and baking them at 375 degrees for two hours. I also diced the butternut squash (only about half the squash), wrapped it in tin foil, and threw it in the oven with the squash for about an hour. Then, I let both packets cool, and simply put them in the fridge.

The next day, I peeled and sliced the beets (after you roast them, the skins slide right off). I put some of my freshly washed mixed greens in a bowl, topped with sliced beets and diced squash, them sprinkled some pecans and goat cheese on top. Easy, delicious and pretty dang healthy!

Cooking from a CSA, Part 10: Sometimes, it’s not exciting

So, what have I been up to? Running. Lots and lots of running. I’ve been training for a marathon for months and the last few weeks have translated to a lot of running and very little of anything else. But the big day is this Sunday, and then I’ll catch you up on what I’ve been doing–because I did squeeze a few fun projects in.

I’ve also been struggling with the CSA the past month or so. It’s been a hard year for the farm, and I completely sympathize with that. We had a hot dry summer, and they lost some crops. That’s part of the gamble you take when you join a CSA. At the same time, though, it’s hugely disappointing to have the amount of food you are getting in each batch drop off at the same time you are switching to a half share.

See, in the spring, I was getting vegetables every week. Almost more vegetables than I could reasonably eat. My grocery bill fell significantly because I was getting big deliveries of produce with a lot of variety every week. But when the summer share started, and I switched to half share–or every other week delivery–the amount of food I received each week also fell. I also stopped getting combinations of vegetables that were easily converted into well-rounded meals. So I’ve had to go to the grocery store to buy stuff to round it out, which is really disappointing when I’m pay so much money per month for veggies.
That’s not to say that I’m not happy with what I’m getting, just that I was expecting a little more–more tomatoes, for instance. Or zucchini. Or eggplant. But I’ve actually gotten more tomatoes from my mom this year.

We’ve definitely made the switch over to fall here in Milwaukee, and I’ve been taking advantage of the cooler weather and roasting most of my vegetables. This week I made a nice, almost stew-like batch of roasted veggies with potatoes, onions, cauliflower, turnips,  and carrots. I sprinkled a spice mix (Forward from Penzey’s, a paprika-based blend), salt, pepper and little bit of honey on top and baked for about an hour. That’s the type of simple meal I’ve enjoyed. Not too exciting, but a great way to get a hearty meal out of a random mix of vegetables (note: I bought the potatoes and onion at the store to round out the veggie mixture).

Hopefully as the season winds to a close and I started getting fall squashes, I’ll feel more inspired.

Cooking from a CSA, Part 9: Caponata with Poached Eggs

In my latest CSA box I found eggplant and celery. It seemed like the perfect time to try making caponata, an excellent dish for summertime picnics. When I first tried caponata last summer, I couldn’t imagine that I would like cold eggplant, but yum! It’ a complex blend of flavors and textures, that taste great on bread. After a little research, I decided to adapt a recipe from Mario Batali (adding celery and olives).

First, I ate the caponata on french bread, as it’s normally served. But after a long run this weekend, I decided that adding a little protein would be a great addition and used the leftovers for a fabulous post-run breakfast, with eggs and toast.

Caponata with Poached Eggs (adapted from Mario Batali)

  • 1/2 cup  olive oil
  • 1 large onion, chopped
  • 1 slender bunch of early celery, chopped
  • 3 tablespoons pine nuts
  • 3 tablespoons golden raisins
  • 1 tablespoon hot chili flakes, plus extra for garnish
  • 1 large eggplant, cut into 1/2-inch cubes (to yield 4 cups)
  • 2 tablespoons sugar
  • 1 teaspoon cinnamon
  • 1 teaspoon unsweetened cocoa powder
  • 2 teaspoon fresh thyme leaves or 1/2 teaspoon
  • 12 oz can diced tomatos
  • 1/3 cup balsamic vinegar
  • 1/3 cup pitted kalamata olives
  • Salt
  • pepper
  • 2 eggs
  • sliced baguette or other crusty loaf bread
  1. In a large pan, heat the olive oil over medium heat and add the onions, celery, pine nuts, golden raisins and chili flakes. Stir frequently, cooking until just softened, about 4 minutes.
  2. Stir in the eggplant, sugar, cinnamon, and cocoa and cook for 5 more minutes. Add herbs, tomatoes, and vinegar and bring the mixture to a boil. Stir in the olives.
  3. Set the heat to low and simmer for about 7 minutes, until it begins to thicken. and remove from heat.
  4. This recipe makes a generous few meals, and can be frozen for later. It can be eaten warm, but is traditionally eaten cold  or room temperature. I highly recommend it with poached eggs: Set a deep pan of water to boil, once boiling, add a glug of white vinegar, if desired, and give the water a little swirl with a spoon before adding two eggs. Continue gently swirling the water until the eggs are cooked, and then remove them with a slotted spoon. Toast two slices of bread, top with caponata, and place a poached egg on each slice.

Cooking from a CSA, Part 8: Freezing Basil

It’s been a while since I blogged about the CSA. It’s been incredibly hot here in Wisconsin this July, making me not want to cook in my un-air-conditioned kitchen. With that, plus the fact that I’m on the half share and not getting nearly as many vegetables and making a lot of repeat dishes, my kitchen has been boring.

But no more! I actually scored a CSA bonanza this week. When I went to pick up my share, I didn’t grab my basil out of the box. Apparently no one did. And there was an extra box down there, so I walked away with two CSA shares and entire box of basil. (I did try to contact other CSA members to see whose share I had, but no luck.)

I had a ton of cauliflower and two boxes of tomatoes, both of which have already gone to good use in Cauliflower and Parmesan Cake and Tomato and Corn Pie. These two dishes (from Smitten Kitchen) are two of my absolute favorites, but both taste best in season–especially the Tomato Pie. In fact, last year, I tried to make it with store-bought tomatoes after tomato season ended, and it just didn’t have the same oomph that makes it so wonderful during the season.

Both those dishes used a healthy dose of basil, but even after I gave away bunches to coworkers, my carpool buddy, and even my landlord, I still had 10 giant bunches of basil left. What to do? I froze it.

It’s super-easy to freeze basil. I rinsed it thorough in a colander, spun it in my salad spinner to remove the water, and laid it on a dish towel in a single layer. Then I rolled up the dish towel to gently wring out the last of the water, unrolled it, and put the basil in a freezer bag in a single layer. I sucked all the air out the bag with a straw, and threw it in the freezer. The basil won’t have the same leafy texture that fresh basil has, but it has a bit more flavor and body than dried basil, so it works great for cooking.

Ice cream! With fresh cherries! And booze!

A few years ago, my awesome former roommate got me an ice cream maker for my birthday or Christmas. I LOVE ice cream. It’s my all-time favorite food. But I don’t make it from scratch that often…and after this week I remember why—it takes a good chunk of time. Making ice cream is a two or three day process. Luckily, the results are usually worth the wait.

I always store my ice cream maker cylinder in the freezer, so it’s ready to go when I want to make some (otherwise it’s an additional 24-hour wait while it freezes). I had some very ripe cherries in the fridge that needed to be turned into something, so when I found this recipe by Apple a Day, it sounded perfect.

It took one evening to make the custard base and prep the cherries. The next evening, I took it out of the fridge and churned it in the ice cream maker. Then it took another day to freeze through. But we tried it last night—and it was fabulous!

Cherry Bourbon Ice Cream (adapted from Apple a Day)

  • 1 pint whipping or heavy cream
  • 1 cup milk
  • 1 1/4 cup sugar, divided
  • 6 egg yolks
  • 1/2 teaspoon vanilla extract
  • 1 lb. fresh cherries, pitted and halved (I used a dark red variety)
  • 1 teaspoon fresh lemon juice
  • 5 tablespoon bourbon, divided
  1. In a large saucepan, combine the egg yolks and 3/4 cup of the sugar, whisking together until blended. Set aside.
  2. Mix the cream and milk in a saucepan. Heat on medium, stirring occasionally, until it starts to steam (about 5 minutes).
  3. Gradually add the hot cream to the egg mixture, whisking constantly so the eggs don’t cook. Heat the mixture on medium, stirring constantly until the mixture thickens enough to coat the spoon or spatula and you can see a trail if you run a finger down it. (About 7-9 minutes) Don’t let the custard boil.
  4. Place a mesh sieve over a clean, heat-proof bowl, and pour the custard through. Stir in the vanilla.
  5. Place the custard bowl in a larger bowl and fill the large bowl with enough ice water to be level with or above the custard level. (This is to cool the custard consistently.) Allow the custard to cool to room temperature—it may take up to an hour.
  6. In a saucepan, mix the remaining 1/2 cup sugar, the cherries, and 2 tablespoons of the bourbon over medium-high heat. Bring to a low simmer and cook until the cherries have expelled their juices and softened, and the liquid has begun to thicken (about 10 minutes). Strain the cherries, reserving the liquid. You might have anywhere from 1/2 to 1 cup liquid.
  7. In a small bowl, mix the cherries with the lemon juice and remaining 3 tablespoons of bourbon. Let everything cool to room temperature, then mix the cherry liquid into the custard, and put the custard and the cherries in the refrigerator over night.
  8. Set up your ice cream maker and churn/freeze the custard according to your maker’s instructions, adding the cherries in the last 5-10 minutes of churning. Since I don’t have air conditioning in my kitchen, it took almost 40 minutes for my custard to freeze to a nice slushy state, which is when I added the cherries.
  9. Transfer the ice cream to a freezer-proof container (I used an 8-cup Glad freezer container), and freeze until set—probably at least 4 hours.
  10. Enjoy!

Cooking from a CSA, Part 7: Moving to a Half-Share

Two weeks ago my CSA’s spring share ended and I moved to a half share for summer. I’m kind of relieved (after all, you know I’ve been having trouble eating everything), but I already miss having a full fridge all the time.

20120623-161232.jpgI’ve made the most of my last two batches including a lemony risotto with sugar snap peas, asparagus, Swiss chard and fennel. While it was a nice blend of vegetables, it definitely wasn’t a recipe worth sharing. Way too lemony with nothing to balance it out. That’s what happens when you make up your own recipes and just throw stuff in a pot to see what happens—sometimes the results aren’t perfect, even if they’re pretty.

A more successful rice dish was thing one:

20120623-161446.jpg

This was another “throw stuff in a pot and see what happens” recipe, but I was delighted by the outcome—and it made great leftovers. I started with a bag of brown and wild rice blend (Lundberg Wild Blend) from the grocery store and cooked it according to the instructions with vegetable broth and a tablespoon of butter. There was still a bit of liquid when the rice was done, which ended up being a good thing because it coated the vegetables like a sauce and helped my leftovers heat up with out over-drying. (Dry crunchy rice leftovers = eew).

Brown and Wild Rice with Garlic Scapes, Fennel and Swiss Chard

  • 1 cup Lundberg’s Wild Blend
  • 2 cups vegetable broth (I used a can + water to make 2 cups)
  • 1 tablespoon butter
  • 1 tablespoon olive oil
  • 3 garlic scapes, finely sliced
  • 1 fennel bulb, ends removed, finely sliced (I also removed the very solid pieces of the core)
  • 1 bunch Swiss Chard, ribs removed, cut in 1-in. ribbons
  • salt
  • pepper
  • thyme
  • cumin

1. Cook the rice according to package instructions (in this case, bring veggie broth, butter, and rice to a boil, cover, and reduce heat to low to simmer for 40-50 minutes).

2. When there’s about 15 minutes left for the rice, begin to warm olive oil in a large sauté pan over medium-low heat. Add the garlic scapes and cook gently until just soft (about 5 minutes).

3. Increase the heat to medium, and add the sliced fennel. Season with salt, pepper, thyme and cumin to taste (I used a dash of the first three and was rather generous with the cumin). Cook until the fennel is tender, but not soft, about 5 minutes.

4. Add the chard ribbons to the saute pan, and cook until barely wilted. Check the rice and see if it’s done (as noted above, I went by texture, not amount of liquid). Add contents of rice pot to saute pan and stir together. Serve warm.

Unfortunately, my CSA suffered a huge strawberry crop failure this year, so I’ve only received two pints of fairly small and very ripe berries. They were perfect for baking and I made a double batch of Smitten Kitchen’s Strawberries and Cream Scones. They were wonderful right out of the oven:

20120623-161408.jpg

And they’ve also worked out well frozen. I simply shaped them, put them on individual pieces of parchment paper…

20120623-161309.jpg

…and thrown them in a freezer bag. Then I bake them according to the recipe instructions. This is a trick that I learned from Deb at Smitten Kitchen (she mentions it right in her recipes if you can make them ahead, which is fantastically helpful). Since scones are best right out of the oven, it’s nice to have a supply in the freezer!

20120623-161338.jpg

Cooking from a CSA, Part Six: What do I do with all these scraps and extras?

Let’s go back to the end of last week. You might remember that I was feeling a little discouraged because I didn’t get through all the vegetables and ended up throwing some stuff out. This week I again had the same problem—I just couldn’t get through everything, especially since I didn’t cook that much over Memorial Day weekend. I hate wasting food, and I’m throwing out a ton of ends and outer leaves that would be great for something like composting or juicing or making stock. So I sat back and looked at my options.

Composting is out, because I don’t have any use for compost or space to do it on the scale I require for the amount of scrap veggies I’m producing. I could keep scraps and take them out to my parents’ to compost there, but it seems kind of pointless, personally. If I did have a yard, or even a patio/balcony garden, this would be a great option.

I seriously considered buying a juicer this week. I must have read about thirty different juicer reviews and talked to a half dozen people about their juicers this week. I love fresh juice, and I actually did a modified juice/raw diet for about a week earlier this year—not really as a weight loss plan, but because I just felt lousy after all the junk I ate over the holidays, and it was a good way to cut myself off from the bad habits completely, give my system (which was feeling overtaxed) a break, and think carefully about everything I was eating. It helped me get my eating habits back on track. But I’m not considering it as a lifestyle change, and I normally like to eat my fruits and vegetables instead of drink them. Also, I would end up spending a lot of money on fruits and veggies to make ideal juice combos—I don’t get many fruits in my CSA box and I don’t like many straight vegetable juices. Plus, a quality juicer is pretty expensive and there are other items I’d rather buy (a nice digital camera springs immediately to mind!). So, a juicer an option I might consider in the future, but I’ve ruled it out for now.

So, for now, I’ve settled on making vegetable stock as the best option for my CSA leftovers and scraps. I actually started this week by throwing a bunch of my leftovers (mostly lettuce, radishes and other salad goodies) into a freezer-proof tupperware container and throwing it in the freezer. As the week goes on, I’ll add more scraps—and I should have great stock-making scraps this week, since I just received carrots, leeks, green garlic, and plenty of other great vegetables. It’s important to note that I’m only saving stuff that is still fresh and has been cleaned to the bin. No past-their-prime veggies—as Vegan Yum Yum points out here, that’s probably why many commercial veggie stocks taste so bland. Expect an update when I make the first batch.