Framing artwork

So Mary and I had our typical reunion weekend: We got our DIY on.

We spent some time talking about her bathroom and even went tile shopping.

And we spent a long, long time learning that navy blue looks very Americana on large pieces of furniture, rather than blue-black.

And we had some fun at the World’s Largest Block Party:

The lesson from this photo is: Don’t take a photo with your back to the sun.

And I had some great success frame shopping!

Over the last few months I’ve purchased two reprints of historical photos (from 20×200.com) A colorized photo of Paris during the 1890 World’s Fair and an early motion-photography series of an elephant walking. They both presented some framing challenges in that neither fit standard frame/matte size.

Let’s start with the Paris print. I found a frame that I loved at West Elm this weekend. I thought the neutral tones would look great with the old-timey sepia tones of the photo. But when I placed it under the matte, I saw this:

Big strips of white on the top and bottom.

At first I was really bummed. I love this frame and picture together, but I couldn’t see how it could work without a new matte. Then I realized I could just take a craft knife to a sheet of nice paper and make a little window. So I searched through my paper collection and found a sheet of creamy watercolor paper. I used a light pencil to trace the inner edge of the matte onto the paper, then I measure just far enough in on each side to cover the white (I had to come in on the non-white sides too, so it would look even). Then I used the craft knife and a straight edge to cut out the inner rectangle. I’ll admit—it took me a few tries to get the corners perfect and all the lines straight, but look at the final result:

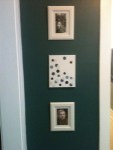
I had a similar issue with the elephant print—we found the perfect frame last time Mary visited me. It was just the right proportion to fit the image, but we couldn’t find a matte to match. So I had a custom matte cut at Michaels. We did have a little mishap with the first matte—it was even around the paper, not the image—but Michaels redid it for free, which was great! Here it is with the standard frame and custom matte:

Perfect fit!

Now my only dilemma is where to put them. Right now I just have them propped against the walls in different rooms, which works fine for the time being.

Welcome to Chicago!

Hey Lesley,

Can’t wait to see you tomorrow! You asked in your last email what we might be up to this weekend. Don’t know yet, but here are things I hope to get up to this summer (when you’re visiting and not).

-Refinish the not-matching frame on the picture in my bedroom my dad gave me

-Do something classier to the edge of the shelf in the living room

-Restyle my mantel, which is getting more cute things, but less cute looking

-Figure out what to do with my awesome coffee tables so they look cute

-Organize my newly-enlarged basement storage unit (hooks!)

-Make large art for my dining room (I think at my birthday party!)

-Refinish the buffet that will go in my dining room

-Rearrange my dining room stuff into the new buffet

-Redo entire bathroom (you know, rip out walls, put new walls up, have someone build a shower including 3/4 wall and new plumbing, find new vanity, shelves, and so on. No big deal.)

What are you up for this weekend?

Can’t wait to see you!

Mary

Cooking from a CSA, Part 7: Moving to a Half-Share

Two weeks ago my CSA’s spring share ended and I moved to a half share for summer. I’m kind of relieved (after all, you know I’ve been having trouble eating everything), but I already miss having a full fridge all the time.

20120623-161232.jpgI’ve made the most of my last two batches including a lemony risotto with sugar snap peas, asparagus, Swiss chard and fennel. While it was a nice blend of vegetables, it definitely wasn’t a recipe worth sharing. Way too lemony with nothing to balance it out. That’s what happens when you make up your own recipes and just throw stuff in a pot to see what happens—sometimes the results aren’t perfect, even if they’re pretty.

A more successful rice dish was thing one:

20120623-161446.jpg

This was another “throw stuff in a pot and see what happens” recipe, but I was delighted by the outcome—and it made great leftovers. I started with a bag of brown and wild rice blend (Lundberg Wild Blend) from the grocery store and cooked it according to the instructions with vegetable broth and a tablespoon of butter. There was still a bit of liquid when the rice was done, which ended up being a good thing because it coated the vegetables like a sauce and helped my leftovers heat up with out over-drying. (Dry crunchy rice leftovers = eew).

Brown and Wild Rice with Garlic Scapes, Fennel and Swiss Chard

  • 1 cup Lundberg’s Wild Blend
  • 2 cups vegetable broth (I used a can + water to make 2 cups)
  • 1 tablespoon butter
  • 1 tablespoon olive oil
  • 3 garlic scapes, finely sliced
  • 1 fennel bulb, ends removed, finely sliced (I also removed the very solid pieces of the core)
  • 1 bunch Swiss Chard, ribs removed, cut in 1-in. ribbons
  • salt
  • pepper
  • thyme
  • cumin

1. Cook the rice according to package instructions (in this case, bring veggie broth, butter, and rice to a boil, cover, and reduce heat to low to simmer for 40-50 minutes).

2. When there’s about 15 minutes left for the rice, begin to warm olive oil in a large sauté pan over medium-low heat. Add the garlic scapes and cook gently until just soft (about 5 minutes).

3. Increase the heat to medium, and add the sliced fennel. Season with salt, pepper, thyme and cumin to taste (I used a dash of the first three and was rather generous with the cumin). Cook until the fennel is tender, but not soft, about 5 minutes.

4. Add the chard ribbons to the saute pan, and cook until barely wilted. Check the rice and see if it’s done (as noted above, I went by texture, not amount of liquid). Add contents of rice pot to saute pan and stir together. Serve warm.

Unfortunately, my CSA suffered a huge strawberry crop failure this year, so I’ve only received two pints of fairly small and very ripe berries. They were perfect for baking and I made a double batch of Smitten Kitchen’s Strawberries and Cream Scones. They were wonderful right out of the oven:

20120623-161408.jpg

And they’ve also worked out well frozen. I simply shaped them, put them on individual pieces of parchment paper…

20120623-161309.jpg

…and thrown them in a freezer bag. Then I bake them according to the recipe instructions. This is a trick that I learned from Deb at Smitten Kitchen (she mentions it right in her recipes if you can make them ahead, which is fantastically helpful). Since scones are best right out of the oven, it’s nice to have a supply in the freezer!

20120623-161338.jpg

A Better Bathroom: The Seeds of an Actual Plan

I’m out in Colorado for a few days to go through my grandparents belongings (they’ve both passed away within the last year). It’s nice to see family, although its definitely not a vacation. And to add to it, it looks like this:

Scary stuff—it’s been nine days and it isn’t even contained yet.

In all of my free time, I’ve been looking at pictures of bathrooms and discussing them with various family members.

  • I should do a shower and not a tub (everyone)
  • We can totally do plumbing.
  • And frame a wall.
  • And tile. (Uncle Rob)
  • Get a swinging glass door, not sliding (Aunt Sharyl)
  • Oooh, pretty tile (Cousin T)

These are the things I HAVE decided on:

Open shelves over the toilet

A shower (?!?! but I’m excited about it)

Cabinets above the door (I can only find pictures of shelves, but I want closed storage)

Glass swinging door on the shower (my Aunt Sharyl says she wishes that’s what they had instead of sliding, water on the floor and all. Sold.)

And then some things that are STRONG MAYBES:

A larger vanity base

With an open shelf on the bottom

A niche shelf in the shower

An accent band of tile in the shower, with either grays or blues

Plus some HMMM INTERESTING THOUGHTS:

Maybe dark wood base on the vanity (with a light colored top)

Some extra storage on one exterior side or the other of the shower, like this.

And things I really should have some concept of but have NO IDEA:

A medicine cabinet (I did like this oval frame one)

A new toilet (?!?! maybe I need one??)

What do you think? Are you on board with my shower-only craziness?

A Better Bathroom: A Wrench in the Works (er…my mind)

Most of the delay in fixing the bathroom is my own indecision. I have the money saved up, I’ve been pinning ideas, I even have the tub picked out.

Except.

Do I need a tub?

Before you answer, hear me out. I was talking with a neighbor and her husband and we were talking about how we don’t take baths but we still need to have a tub “for resale.” Which is a good point: Do people really want to buy a place without a tub? Keep in mind, my condo is a 1-bed, 1-bath. Most adults do take showers instead of baths. I realize I would be turning off some potential buyers when I want to sell, but how many?

Here’s the thing: One of the biggest reasons people want a tub is that kids don’t take showers. You have to put them in a bathtub. But I’m pretty sure nobody has a baby in a one bedroom on purpose. And if they do, they have almost two years to go find something fit for a family (because the baby doesn’t go in a tub right away; you use a baby tub, or so says my mother).

I’ve never been excited to take a shower in a bathtub, no matter how fancy (and mine? Won’t be fancy. Tiny bathroom, remember?). But a shower? My best friend has an AWESOME shower. It has a regular shower part and then a rain shower and then four body jets and also a steam shower. And a bench. The whole show is oriented about 8 in. too high for me, since they are both tall and I am not. But still. Every time I watch their cats, I’m all excited to go over there and shower and then glare at the tv because I’m never entirely sure how to work it so I can’t actually watch. But the point is, the shower is really nice.

So, I would probably be all excited to take a shower in my nice new bathroom, but not to have a nice new (little-ish) bathtub. And then I could have a larger vanity, and the shower would be nice. And some people (but really, how many?) would be like, “Huh, this place doesn’t have a tub. What were they thinking? Next!” but other people would be like, “That shower looks awesome. I never take baths anyhow.”

I was going to put pictures in here, but that really isn’t the point. People have plenty of bathrooms with just a shower, the issue here is to ONLY have a shower.

What should I do?!

Cooking from a CSA, Part Six: What do I do with all these scraps and extras?

Let’s go back to the end of last week. You might remember that I was feeling a little discouraged because I didn’t get through all the vegetables and ended up throwing some stuff out. This week I again had the same problem—I just couldn’t get through everything, especially since I didn’t cook that much over Memorial Day weekend. I hate wasting food, and I’m throwing out a ton of ends and outer leaves that would be great for something like composting or juicing or making stock. So I sat back and looked at my options.

Composting is out, because I don’t have any use for compost or space to do it on the scale I require for the amount of scrap veggies I’m producing. I could keep scraps and take them out to my parents’ to compost there, but it seems kind of pointless, personally. If I did have a yard, or even a patio/balcony garden, this would be a great option.

I seriously considered buying a juicer this week. I must have read about thirty different juicer reviews and talked to a half dozen people about their juicers this week. I love fresh juice, and I actually did a modified juice/raw diet for about a week earlier this year—not really as a weight loss plan, but because I just felt lousy after all the junk I ate over the holidays, and it was a good way to cut myself off from the bad habits completely, give my system (which was feeling overtaxed) a break, and think carefully about everything I was eating. It helped me get my eating habits back on track. But I’m not considering it as a lifestyle change, and I normally like to eat my fruits and vegetables instead of drink them. Also, I would end up spending a lot of money on fruits and veggies to make ideal juice combos—I don’t get many fruits in my CSA box and I don’t like many straight vegetable juices. Plus, a quality juicer is pretty expensive and there are other items I’d rather buy (a nice digital camera springs immediately to mind!). So, a juicer an option I might consider in the future, but I’ve ruled it out for now.

So, for now, I’ve settled on making vegetable stock as the best option for my CSA leftovers and scraps. I actually started this week by throwing a bunch of my leftovers (mostly lettuce, radishes and other salad goodies) into a freezer-proof tupperware container and throwing it in the freezer. As the week goes on, I’ll add more scraps—and I should have great stock-making scraps this week, since I just received carrots, leeks, green garlic, and plenty of other great vegetables. It’s important to note that I’m only saving stuff that is still fresh and has been cleaned to the bin. No past-their-prime veggies—as Vegan Yum Yum points out here, that’s probably why many commercial veggie stocks taste so bland. Expect an update when I make the first batch.

To Build a Better Bathroom

(Ok, so technically, it’s remodel, but that didn’t have the same ring to it.)

My bathroom is ugly.

I’m not sure pictures even do it justice, but yeah. Not pretty. (It’s also very narrow so getting pictures was a challenge. And I’m a terrible photographer.)

Problem #1: The walls. They are ancient plaster and lath, with weird textures and wallpaper on them. They’re in bad enough shape as to not be salvageable, so they’ll have to come down and be replaced with drywall (hey, I know how to drywall!).

Problem #2: The colors. I realize these come down the walls. But still. They are not my favorite.

Problem #3: Storage. I have no linen closet. Closets in general are at a premium in here, so I store coats and linens and craft supplies and cleaning supplies and other random stuff in the one closet besides my bedroom that I can actually put stuff in. It would be nice to work some storage into the bathroom for at least towels.

Problem #4: The medicine cabinet is not my cup of tea. Its a little old-fashioned, although I already have people waiting in line to get it who think its awesome. Just not my favorite.

Bonus Problem: I don’t like my clawfoot tub.

….Please don’t start. Yes, “some people” love those. But I bet those people don’t have to use them. Whenever I say that, people nod wisely and say, “They are hard to clean under.” (Ahem…wouldn’t know…terrible housekeeper). My issue is I hate showering with shower curtains on both sides of me. Also, its not like mine is nice and fancy or whatever. It’s an original clawfoot tub. I don’t think someone is going to not buy my place when I go to sell it because there is no longer a clawfoot tub.

And one of those things that you only even consider once you realize you need a whole new room: maybe I should get a new vanity.

Sigh.

I’ll tell you about the plans soon–I want to get this party started!

What’s your stance on clawfoot tubs?

Cooking from a CSA, Part 5: Three-Greens Pasta

My favorite meal this week was born of necessity. I was one day away from the next CSA delivery and had a pile of vegetables left to use. One of the easiest ways to reduce a mass of greens is to cook it, so I cleaned three bunches of greens, added some turnips and veggie sausage, and tossed it with some pasta. Quick, easy, and really delicious. The variety of greens adds a lot of subtle flavor, and the veggies sausage (Yves Italian variety, I believe) added some nice spice.

Three-Greens Pasta

  • 1 lb pasta
  • 1 bunch spinach (washed, stems removed, sliced in 1-in. ribbons)
  • 1 bunch arugula (washed, stems removed, sliced in 1-in. ribbons)
  • 1 bunch Swiss chard (washed, stems removed, sliced in 1-in. ribbons)
  • 1 bunch turnips, scrubbed and cut into quarters
  • 2 links vegetarian sausage, sliced
  • 1 tbl. minced garlic
  • olive oil
  • salt, pepper, oregano, thyme (to taste)
  1. Put a large pot of water on to boil for the pasta. Cook the pasta as directed, but add the spinach and arugula for the last 2 minutes of cooking. Just pile it right on top of the pasta and water, and swirl it with a spoon. Then, drain the contents of the pot in a colander and put in a large serving bowl.
  2. While the pasta is cooking, heat olive oil in a large skillet on medium-high heat. Add the veggie sausage and turnips, and sauté for about five minutes, until contents start to lightly brown.
  3. Add chard, garlic and seasoning to the pan, and stir. Cook about 5 minutes, until chard is slightly wilted but still has some body. Remove from heat.
  4. Add sautéed ingredients to the pasta mixture, and stir. Serve immediately.