2012 Favorites

This has been a busy year for me–there are still some projects (some of my favorites!) that need to be wrapped up on here, like the buffet and the bathroom–but many completed that I wanted to look back on.  Here are my Favorites (and some of yours) from the past year.

The most popular post (thanks in part to a few features) on the blog is one of my favorites too:

Pinterest Challenge: Map-lined drawer

Pinterest Challenge: Map-lined drawer

And actually, everything else was a crafty paper thing too.

First up is my favorite (but according to WordPress’ year end review, no one else’s):

Finished Product

My birthday present to myself, made by a forced labor birthday ice cream social (but painstakingly cut and assembled by me)

Many of my projects were gifts, and two of my favorites were for a close friend’s new baby girl:

Made with both parent's favorite childhood books

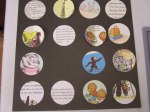
Made with both parent’s favorite childhood books

This banner hung in their living room for three months before moving to the baby's room. So glad they loved it!

This banner hung in their living room for three months before moving to the baby’s room. So glad they loved it!

The Mother’s Day present I made was one of my first posts, and still looks great on my mom’s hallway picture ledges.

Made of a zillion cut and folded paper hearts.

Made of a zillion cut and folded paper hearts.

And an idea everyone should steal (for thermostats, alarm panels and door buzzers like mine): The canvas to cover an eyesore. Dots optional.

The canvas panel just has punched paper dots glued to it and covers the buzzer. No one even knows its there!

The canvas panel just has punched paper dots glued to it and covers the buzzer. No one even knows its there!

I was a little surprised at the prevalence of paper, especially since I DO write about other stuff. And although one of my first posts was about cards, I never post them (something I plan to remedy right away–I love making cards and make tons of them!)

Did you do a Favorites post? I love these, especially for blogs I’m new too–link yours up in the comments so I can see what yours are!

Advertisement

Paper Stars

Paper stars were one of the first, if not the first, craft project Mary and I ever did together. We originally made a bunch as a birthday present for a friend who was decorating her room with a starry night theme. (Apparently when someone tells me I probably can’t do something, like make 3D stars out of paper, I feel inclined to prove them wrong.) They were a huge hit. Then we made a bunch for our room. Then, when we moved, we hung them from the ceiling of our office.

So when we were trying to think of something good for our blog masthead, paper stars seemed like a logical choice. And now you can learn to make your very own!

Now, making the template takes longer than making any of the stars. And the first one or two might be rough, as you are learning to make even folds and match up edges and get the glue to hold while not flattening the whole thing. But! Once you make the first few, they are actually pretty fast and addictive.

Paper Stars

You’ll need…

  • Stiff paper for template
  • Decorative paper for the stars (we’ve used construction, water color, and scrapbook paper with equal success)
  • Protractor
  • Pencil
  • Glue (fine tip glue for scrapbooks works really well)
  • Scissors

Template

  1. Trace a circle onto the template paper using the inner edge of your compass.
  2. Place the Protractor over the circle, and mark at 90° and the mid-point of the straight edge. Flip the protractor so that you mark it at 90° on the other side—marking a straight line dividing the circle exactly in half. Use the edge of the protractor to trace this entire line, and mark the halfway point so you can see the exact center of the circle. (My protractor has a handy opening for just this purpose.)
  3. Making sure your protractor stays centered, mark a point on the circle 72° from the marked line.

    Draw a line through that point and the center point to the other side of the circle.

    Repeat until you’ve made five lines, and the circle is divided into 10 sections. (Alternatively, you can mark every 36° around the circle and connect the dots to make the 10 sections.)
  4. Start at the top point, skip three lines around the edge, and line up your straight edge between the top point and the fourth point. Draw a line between the points.
  5. Skip the next three lines and use your straight edge to draw a line between the fourth point and where you left off.
  6. Repeat until you have a five-point star.
  7. Move your straight edge about 3 or 4 mm from one of the star’s sides and draw a parallel line, skipping the inside of the star itself.

    Repeat until you’ve created a second set of lines around each point (these lines are used for the flaps).
  8. Use your straight edge to mark a gradual taper at each point between the outside lines and the point.
  9. Cut out your template, following the outside lines and the tapered points.

Cutting and folding stars

  1. Trace the template onto the back of your decorative paper. Repeat to trace a second star.
  2. Cut out both stars.
  3. Fold the star in half from an outer point to the inner point directly across from it. Unfold.
  4. Turn the star, and fold in half at the next point.
  5. Repeat until the star has been folded in half at every point.
  6. Gently fold the star, tucking the inside point down and folding the two “legs” on either side together.
  7. Repeat around, so that every inside point folds in, and every outside point folds out.
  8. Now you’ll need to cut a small notch on every inside point to make the folding flaps. Look at your template to see how large this flap needs to be—it’s the distance from the outside of the template to the inner point on the inside set of lines. Cut the notches on all inside points.
  9. Fold each flap in from the notch to the tip of the outside point.
  10. Repeat with the other star, and figure out which points best match each other when they are help inside-to-inside.
  11. Place glue on the flaps of two adjacent points, and firmly press the two star halves together along the glue line. It doesn’t matter if you flatten the stars at this point.
  12. When the glue is dry, gently pop the stars back into their 3D shape, and add glue along two more edges. Be more gentle as you press these edges together—the more edges that are glued, the more difficult it is to pop the star back into shape.
  13. Glue the final edges together and gently press together–by this time, the shape of the star itself should help hold it together.

As you create more stars, you’ll get better at folding evenly, and you’ll discover your own technique for gluing.

{Mary adds:}

{I made a mobile for a coworker with a new baby using the star template, and it turned out awesome. Non-directions here–at the end.}

Have you ever made something cool just to prove you could?

Baby Socks and Onesies: Planning a Shower

This weekend I’m co-hostessing a baby shower for a close friend. I’ve always wanted to throw a shower for someone (I’ve been a maid of honor twice, but nobody wanted a shower. Sad.) I’m hosting with two other friends of the mom-to-be, and our jobs (according to Emily) are:
Sarah: Project manager (she’s in charge of timelines, etc.)
Mary: Creative Director (invites, paper products, look)
Emily: Brings wine (it’s also at her house, so she’ll be hiring a cleaning crew, too)

The parents-to-be aren’t finding out the sex until the baby is born, so our color scheme is green and yellow. (You know where you can get plenty of gender neutral baby stuff? Yeah…me either.) I make my own cards, so I showed the girls some samples of different cards I’ve done and they picked a look they liked the most:

In retrospect, our final product looks nothing like this. But they thought it was cute!

Then I started playing with the colors I actually wanted to use, combined it with this:

And we ended up with this.

We used Emily’s (realtor) husband’s fancy color office printer to print the text in green on white cardstock. We rounded the corners (on everything–the yellow embossed sheets, the green backing and the card itself. Emily and Sarah did that part. Not. Fun.) and then attached the ribbon to the yellow piece. I wanted to make sure the oval (my new die from cuttlebug!) didn’t slide around, so I used a glue dot half on the ribbon and half on the oval to stick them to each other, then to the front. Then we just used tape to attach the ribbon where it folded over to the back. We really liked the look of the white ribbon, and so far people love the embossing (kind of hard to get a picture of, but it’s adorable).

We’ve got a whole bunch of other fun details up our (my) sleeves for the shower–can’t wait to share!